DIY Pottery Barn Dupe: Wood Decor Shelf
There is nothing I love more than strolling through Pottery Barn or Crate & Barrel.
There’s something about that clean, crisp look of all their items.
It exudes that classy and chic feel that is very “in” these days.
While my eyes and heart love those stores, my wallet is not as big as a fan.
That classy, chic feel almost always comes with a pretty hefty price tag that I am just not willing to pay.
I’m happy to report that you, too, can enjoy the same look and feel on a budget!
I’ll show you how.
While I browsed for shelving the other day, I came across a round metal and wood bookshelf from Pottery Barn for $349 and just knew that I could recreate something very similar to it using items I saw at the Dollar Tree and around my house.
While Pottery Barn’s bookshelf is painted gold, I prefer more of a farmhouse look.
And, if I were to create this, it had to fit into my existing decor.
Supplies Needed:
- 2 plastic hoops (similar to Hula Hoops)
- Wood (2 6 ½” pieces or 4 3 ¼” pieces)
- Wood stain, if starting from scratch
- 8 long, black screws
- 4 long screws (if putting two pieces of wood together)
- Rustoleum universal flat black spray paint
- Drill
- Jigsaw
- Measuring tape
- Pencil

Steps To Create A Hoop Shelf
As you’ll see throughout this project, I had a few extra “helpers” this time around!
Our son loves helping and has been asking to help with a project. Our little girl was so confused as to why we would turn a perfectly good Hula Hoop into something else, and my husband got nervous when I asked him where the jigsaw and drill were, so it turned into a whole family affair.
It ended up being a blast doing it as a family, so this is definitely not a project to shy away from if you too end up with extra “helpers.”
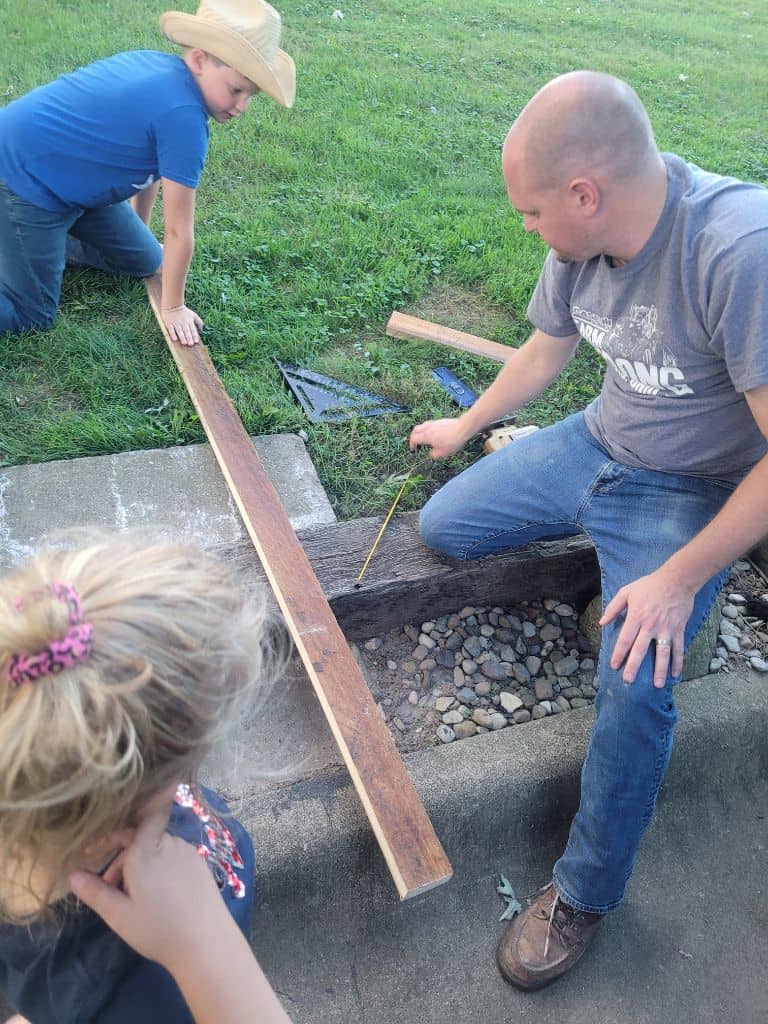
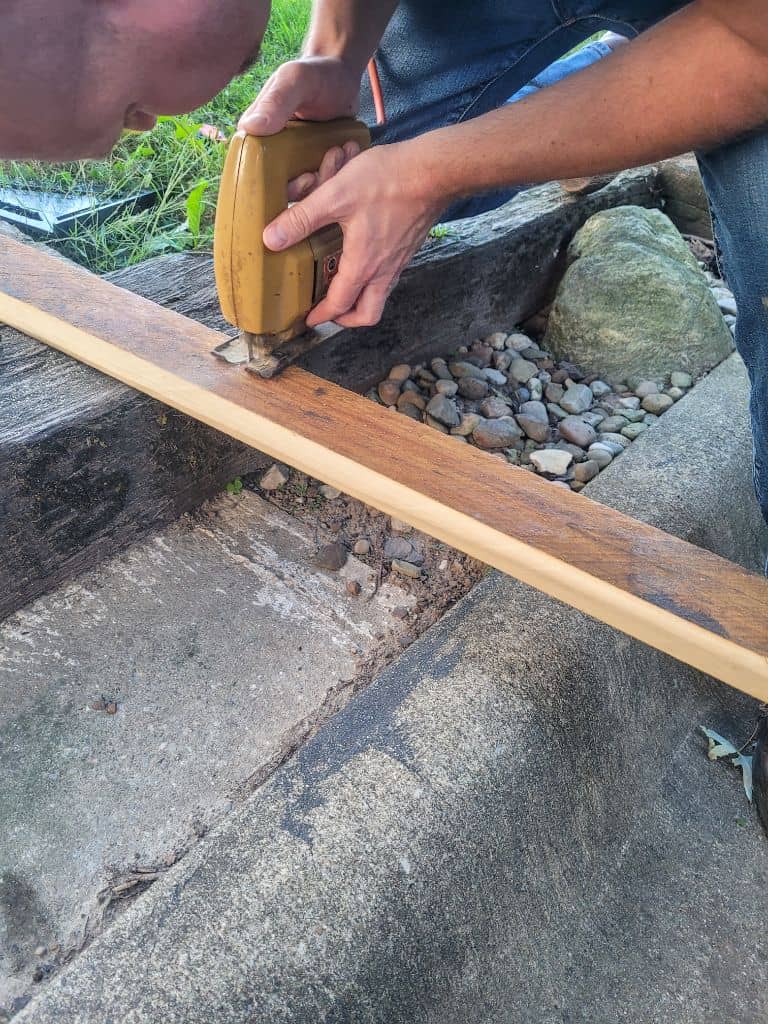
1. Measure, Cut, and Stain Your Boards
Before you start the project, decide where you want your shelves attached to the hoops and measure the distance between the two ends on them to get the right length (see the photo to get a better idea of what needs to be done).
While measuring, plan for a little wood to hang over on each side of the plastic hoop. For our hoops, we chose to cut each of our 4 boards 19.5 inches long. Our stained wood was only 3.25 inches wide, so we opted to clamp and screw two pieces together on each end to give more of a shelf-like width of 6.5 inches.
If you want to save yourself a step, find a piece of wood that has a width of at least 6 inches. Once you have your board cut, stain the wood and let it dry for 24 hours.
Now that everything is cut and stained, do a quick check with the wood and unpainted hula hoops to make sure that you like the length of the boards.
- Related: 11 DIY Dollar Tree Home Decor Crafts
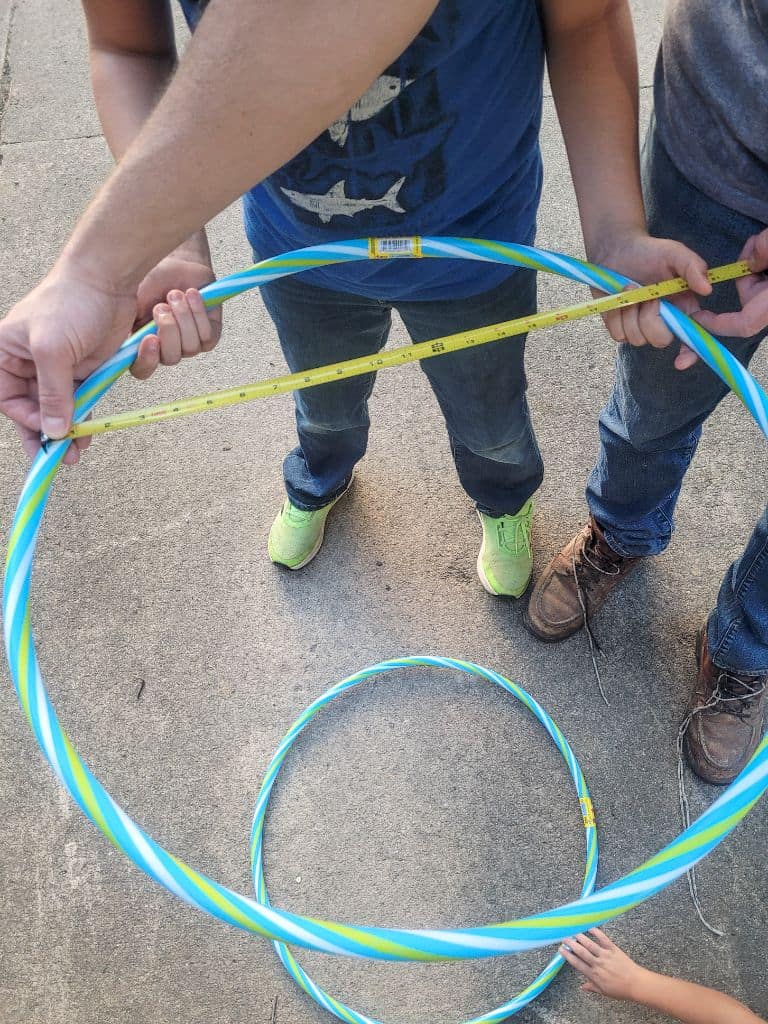
2. Paint Hula Hoops
Now, it’s time to get those plastic hoops painted! Because the dew was starting to set in, we used our gravel driveway to spray paint the hoops.
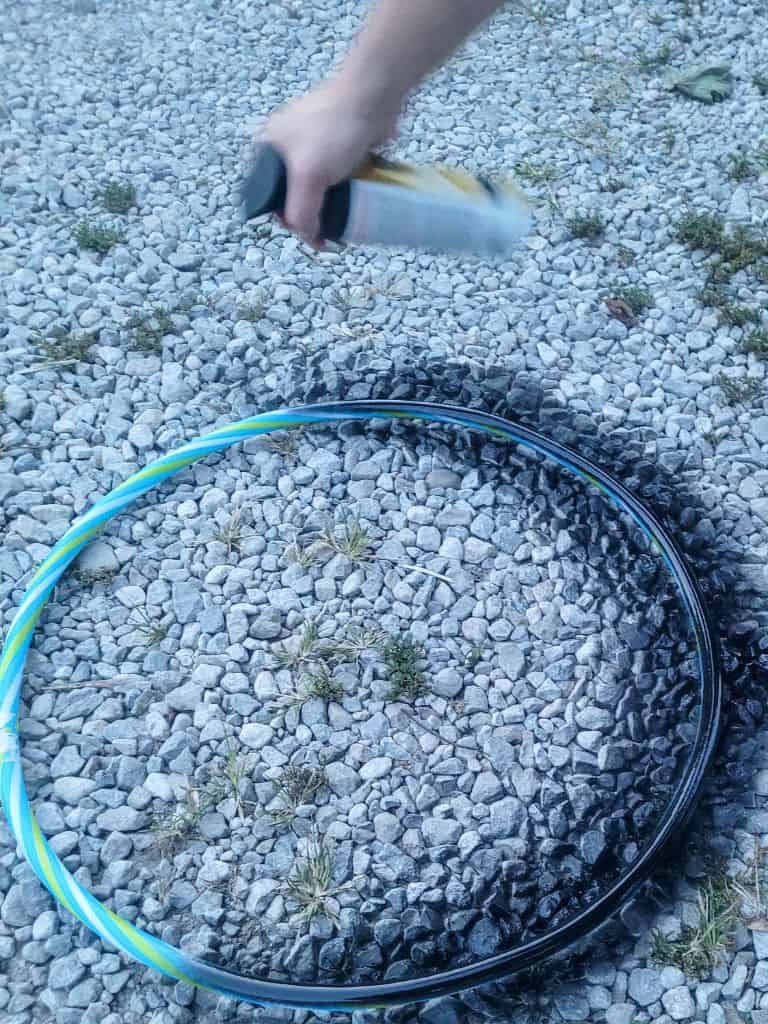
Make sure when you spray paint the hoops that you get the inside and outside rims, as well as the top surface. Each side will take at least two coats of paint.
As soon as the paint is dry and not sticky anymore, turn the hoops over and paint the other sides.
3. Set Everything in Place and Screw the Pieces Together
Now that everything is painted and cut, it’s time to get everything set up and ready to put together! Set your first plastic hoop down, then set your boards on top.
Use your measuring tape to make sure that your boards are the same width apart. We placed ours 12 inches apart. After the boards are set in the correct place, set your second plastic hoop on top.
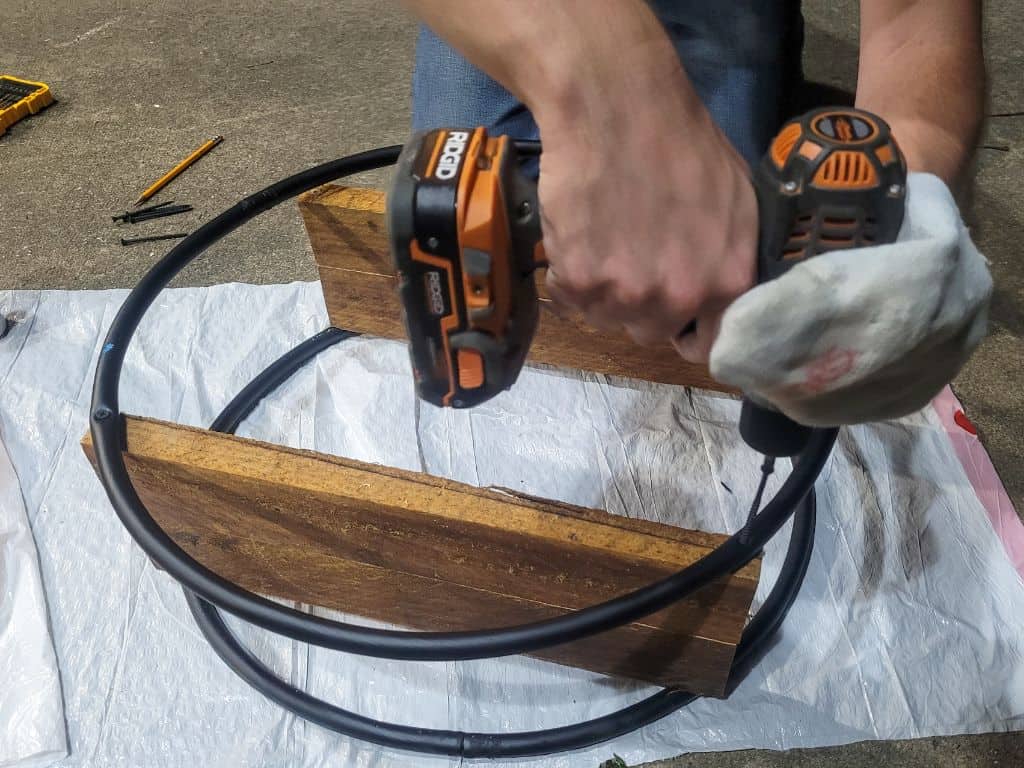
With everything set and in place, take your drill and screws and screw the hoop into place on each board. We used black screws so that they would blend in with the plastic hoops we painted black. Place 4 screws (one on each end of the two boards) into the hoop and board. Once that side is finished, flip it over and do the other side.
Pro Tip: You might need to touch up your paint after this step is completed because the spray paint easily chips. We tried setting ours on trash bags to lessen the scratching but still needed to do a few touch-ups afterward.
- Related: 25 Dollar Tree Fall Decor DIY Ideas
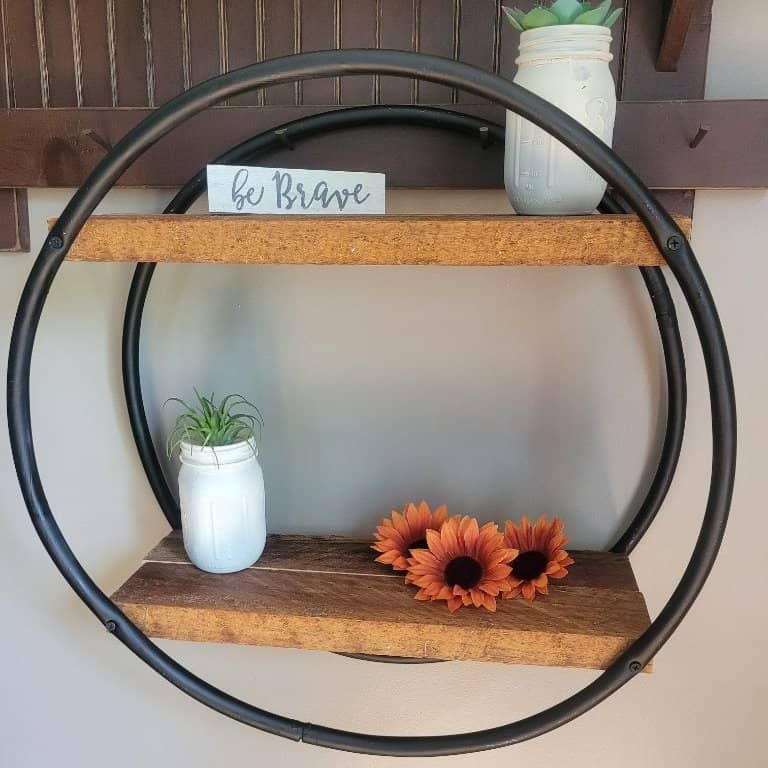
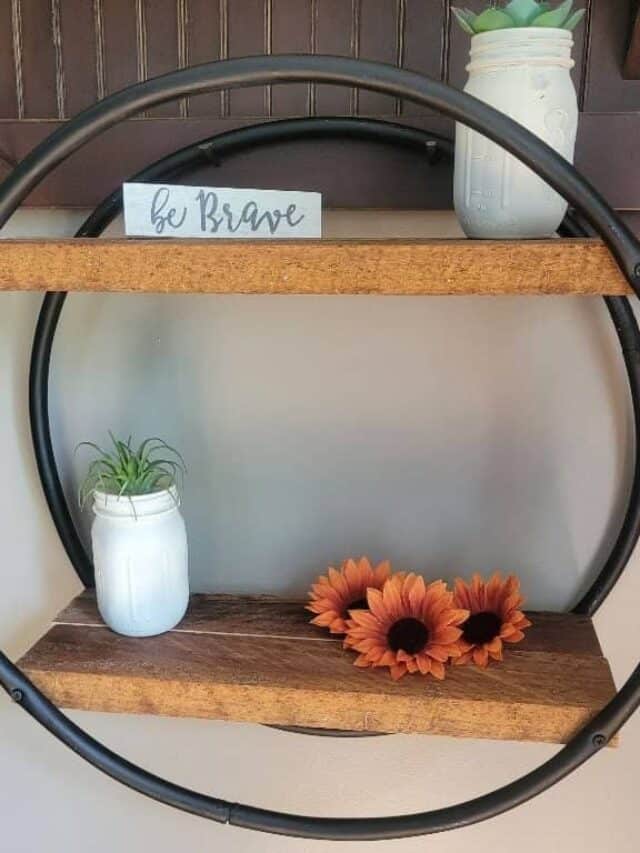
4. Hang and Decorate!
When deciding where to hang your beautiful, new shelf, I would highly recommend using 2 brackets fastened to the wood when you attach it to a wall.
Because of the weight of it and any decorations that you add to it, you will want to make sure it’s fastened properly to a stud in the wall.
Once you have your hoop hung, decorate it to fit the style of the space where you placed it. I was able to use my Mason jar succulents that I made a few months ago and a few other items that I found around the house.
More Budget-Friendly DIY Inspo:
- Dollar Tree Drawer Organization Hack
- DIY Mason Jar Succulents
- DIY Tiered Tray Centerpiece
- 20+ Best Dollar Tree DIY Crafts
- Festive Fall Decor DIYs
- Our Favorite Home Decor DIYs (Dollar Tree edition)
Save more money! Read these next…
- Top 9 Essential Dave Ramsey Tips
- Stop Buying These 9 Things So You Can Save Money
- 43 Hacks to Live on One Income and Never Be Poor
Save at your favorite stores:
- 10+ Things to Always Buy At Dollar Tree (+ what to avoid)
- 7 HomeGoods Hacks You’ll Wish You Knew Sooner
- These are the 9 Target Hacks You Wished You Knew Sooner
- Here are 6 Ways to Save Even More at Walmart
Want to save these tips for later? Click here to pin this post!
Be sure to follow us on Pinterest for more money-saving life hacks!
About the author Lauren Croskey
Lauren Croskey lives with her husband and children in Ohio's Amish Country. When she's not helping companies with social media or running, Lauren freelances for Wooster Media Group.